

How To Install Hadoop On Aws Ec2 Instance
Setup 4 Node Hadoop Cluster on AWS EC2 Instances
Installing Hadoop on AWS EC2 Example
We will endeavour to create an image from an existing AWS EC2 instance later on installing Java and Hadoop on it. If at that place is no example created nonetheless, create one and login to the instance using this article.
Install Java And Hadoop
- Its always a practiced way to upgrade the repositories first.
apt-get updatedownloads the package lists from the repositories and "updates" them to get data on the newest versions of packages and their dependencies.
$ sudo apt-get update && sudo apt-get dist-upgrade 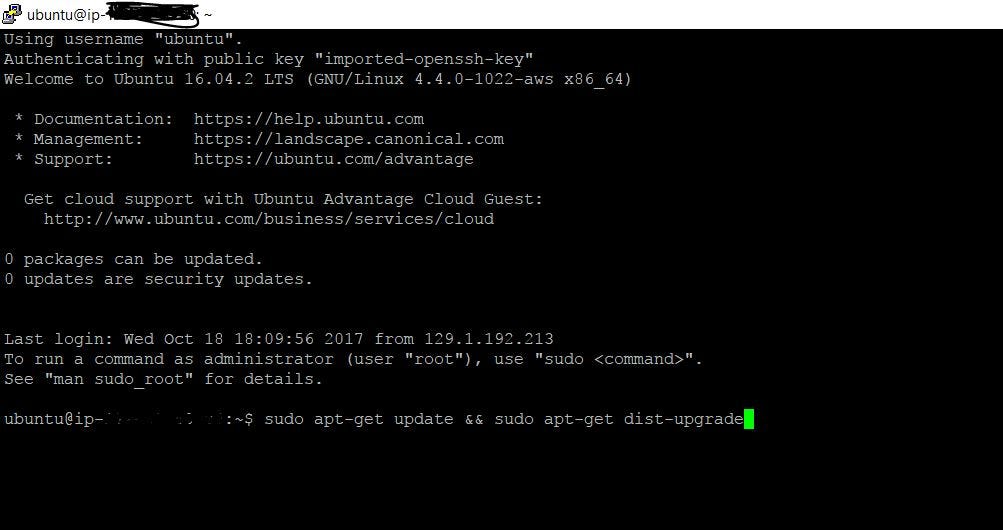
Install OpenJDK
- Installing latest java.
$ sudo apt-go install openjdk-8-jdk 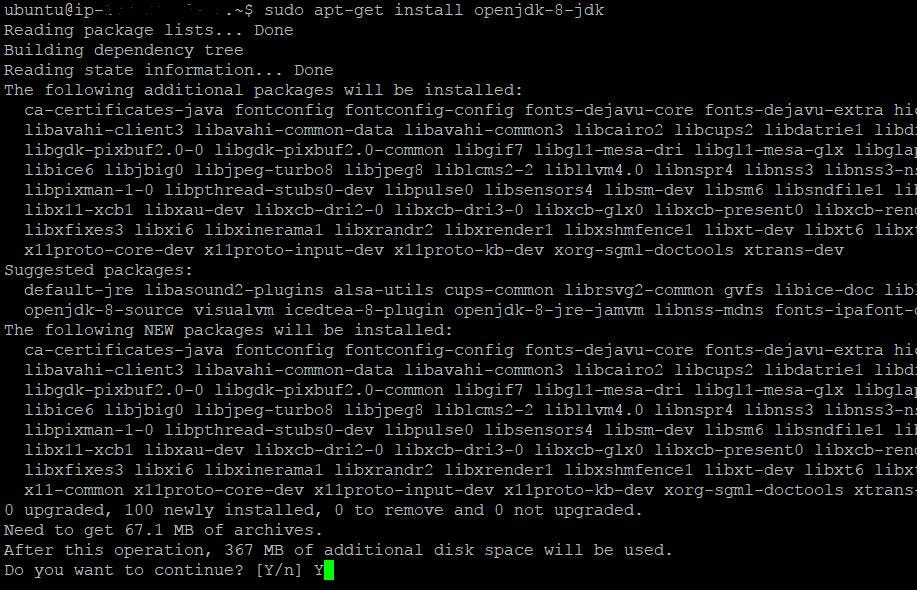
Installing Hadoop
- Download Hadoop from ane of these mirrors. Select appropriate version number. Below control will download gzip file and copies it to Downloads directory, which is created using -P paramter.
$ wget http://apache.mirrors.tds.internet/hadoop/common/hadoop-2.viii.one/hadoop-two.8.1.tar.gz -P ~/Downloads 
- We will now try to excerpt it to
/usr/local.
$ sudo tar zxvf ~/Downloads/hadoop-* -C /usr/local - Renaming the hadoop-* to hadoop nether /usr/local directory.
$ sudo mv /usr/local/hadoop-* /usr/local/hadoop Now the Java and Hadoop are installed. Nosotros will declare the environmental variables in the case, which helps applications locate hadoop.
Setting up Environmental Variables
- To know where the java is installed (where the coffee executable is), execute the below command. Path may be unlike for y'all.

- Open .bashrc file in your home directory with your favorite editor. Include the beneath lines .
$ six ~/.bashrc For Java:
          export JAVA_HOME=/usr/lib/jvm/java-8-openjdk-amd64
export PATH=$PATH:$JAVA_HOME/bin
For Hadoop:
          consign HADOOP_HOME=/usr/local/hadoop
export PATH=$PATH:$HADOOP_HOME/bin
For Hadoop Configuration directory:
export HADOOP_CONF_DIF=/usr/local/hadoop/etc/hadoop For reflecting to current session with out restarting.
source ~/.bashrc Check whether the environmental variables are available or not.
Creating an Image
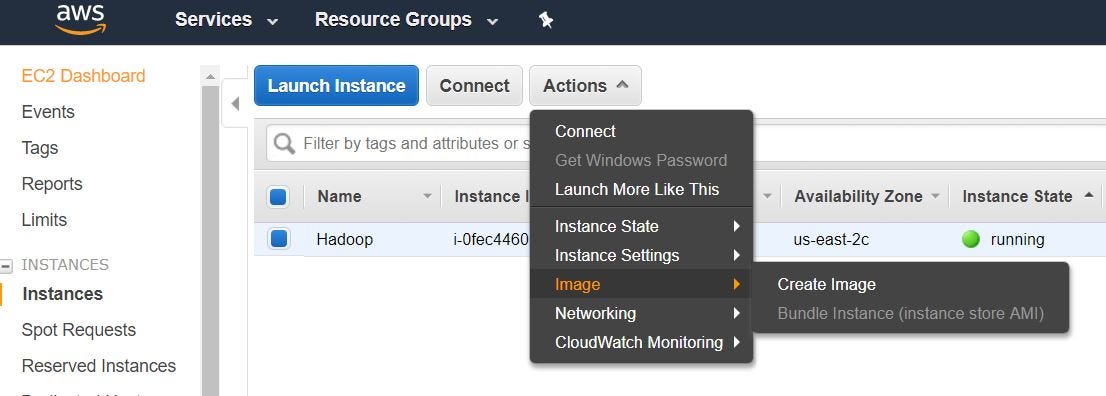
- We volition create an image from AWS panel, with all the above configurations. This helps usa in creating nodes in hadoop cluster with out repeating the above steps for each node.
- On EC2 management console, select "Instances" under INSTANCES. And so "Deportment" -> "Image" -> "Create Paradigm"
- Provide whatever name, clarification and click on "Create Image".
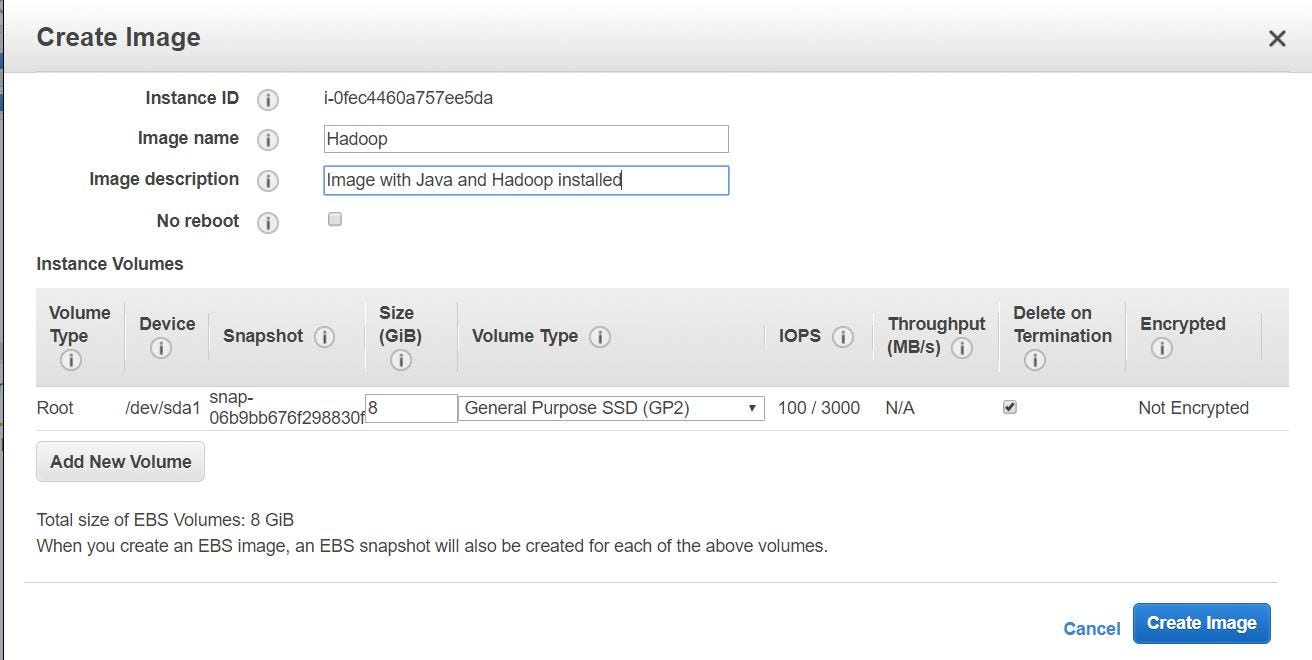
- Y'all will exist able to find the created image nether IMAGES -> "AMIs".
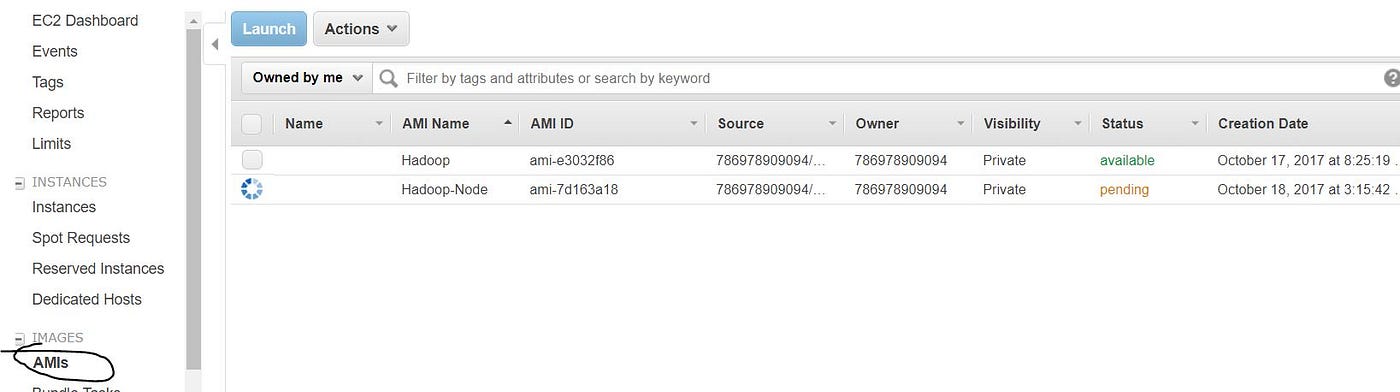
Setting upwards Cluster Nodes from the Image Created
- You have created an image with Java and Hadoop installed, which you lot tin can utilize it to create nodes in the cluster. Select the created image and click "Launch"
- Choose an Instance Type co-ordinate to the requirement. Here we stick the default t2.micro case type. Click on "Next: Configure Instance Details"
- Change the "Number of instances" from 1 to 4 in Configure Instance Details. Out of iv (NameNode -1 , DataNodes-3).
- Default storage. Click on "Next: Add Tags"
- Optional: Create a rule with Name as Key and "Hadoop Cluster" every bit Value and click on "Next: Configure Security Group"
- Select "All Traffic" from the dropdown and click on "Review and Launch". And then Launch with key pair already created.
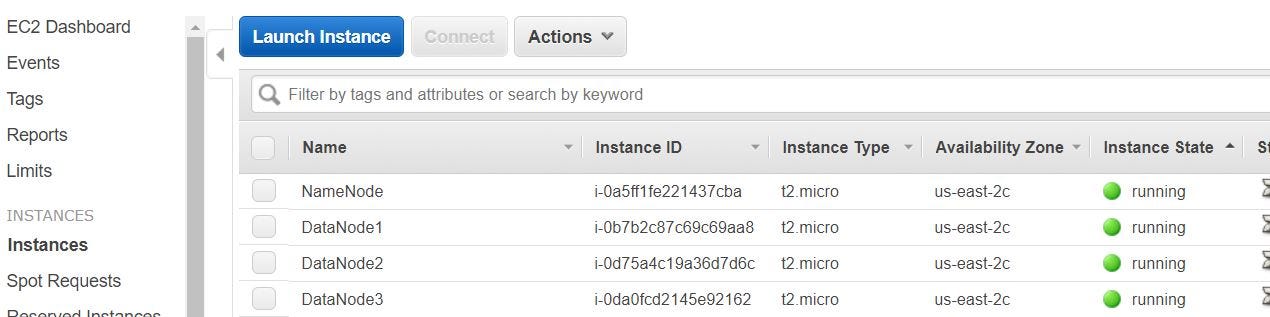
- Instances volition be created as shown below. I have edited the Names for each node.
- Permit's create a SSH config file to log in to the instances easily. On your figurer we could use either Putty (as showed hither) or GIT Bash (ensure it is installed). I volition exist using GIT Bash here.
$ touch ~/.ssh/config 
- Edit the config file.
vi ~/.ssh/config - Re-create the below lines to the file. (Probably you need click on the centre button of mouse to paste in the file)
          Host namenode
            HostName ec2-18-216-40-160.us-e-2.compute.amazonaws.com
            User ubuntu
            IdentityFile ~/.ssh/MyLab_Machine.pem          Host datanode1
            HostName ec2-xviii-220-65-115.united states-east-2.compute.amazonaws.com
            User ubuntu
            IdentityFile ~/.ssh/MyLab_Machine.pem          Host datanode2
            HostName ec2-52-xv-229-142.the states-east-2.compute.amazonaws.com
            User ubuntu
            IdentityFile ~/.ssh/MyLab_Machine.pem          Host datanode3
            HostName ec2-18-220-72-56.us-east-ii.compute.amazonaws.com
            User ubuntu
            IdentityFile ~/.ssh/MyLab_Machine.pem
- This file lets SSH acquaintance a shorthand name with a hostname, a user, and the private primal, so you don't accept to blazon those in each time. This is assuming your individual primal
MyLab_Machine.pemis in.ssh. If it isn't be sure to move or copy it there:cp key_file ~/.ssh/MyLab_Machine.pem. At present you can log into the NameNode with only$ ssh namenode. Also, copy the config file to the NameNode.
$ scp ~/.ssh/config namenode:~/.ssh 
- We need to make sure the NameNode can connect to each DataNode over ssh without typing a password. You'll exercise this by creating a public primal for the NameNode and adding it to each DataNode.
- Log in to NameNode, create a public fundamental using ssh-keygen and copy it to authorized_keys.
          $ ssh namenode
$ ssh-keygen -f ~/.ssh/id_rsa -t rsa -P ""
$ cat ~/.ssh/id_rsa.pub >> ~/.ssh/authorized_keys - In order to login to the each DataNode without a password from NameNode. Copy the authorized_keys to each DataNode.
          $ ssh datanode1 'true cat >> ~/.ssh/authorized_keys' < ~/.ssh/id_rsa.pub
$ ssh datanode2 'cat >> ~/.ssh/authorized_keys' < ~/.ssh/id_rsa.pub
$ ssh datanode3 'cat >> ~/.ssh/authorized_keys' < ~/.ssh/id_rsa.pub - Try logging into DataNodes and test if yous are able to login without a password.
Configuring the Cluster
Cluster-wide configuration:
- First, you'll deal with the configuration on each node, then get into specific configurations for the NameNode and DataNodes. On each node, become to the Hadoop configuration folder, yous should be able to get there with
$ cd $HADOOP_CONF_DIRsince nosotros set that in.bashrcbefore. When editing these configuration files, you'll need root admission so think to employ$ sudo. In the configuration folder, editcore-site.xml:
          <configuration>
            <belongings>
            <name>fs.defaultFS</proper name>
            <value>hdfs://<your namenode public dns name>:9000</value>
            </belongings>
</configuration> - This configuration
fs.defaultFStells the cluster nodes which motorcar the NameNode is on and that it will communicate on port 9000 which is for hdfs. - On each node, in
yarn-site.xmlyous set options related to YARN, the resource director:
          <configuration>          <!— Site specific YARN configuration properties -->                      <property>
            <name>yarn.nodemanager.aux-services</name>
            <value>mapreduce_shuffle</value>
            </property>
            <belongings>
            <proper noun>yarn.resourcemanager.hostname</proper name>
            <value><your namenode public dns name></value>
            </property>
</configuration>
- Similarly with fs.defaultFS, yarn.resourcemanager.hostname sets the machine that the resource director runs on.
- On each node, copy
mapred-site.xmlfrommapred-site.xml.template
$ sudo cp mapred-site.xml.template mapred-site.xml - Add below to the mapred-site.xml
          <configuration>
            <property>
            <proper noun>mapreduce.jobtracker.address</name>
            <value><your namenode public dns name>:54311</value>
            </property>
            <property>
            <name>mapreduce.framework.proper name</name>
            <value>yarn</value>
            </holding>
</configuration> - Again,
mapreduce.jobtracker.accostsets the machine the job tracker runs on, and the port information technology communicates with. The other option heremapreduce.framework.proper nounsets MapReduce to run on YARN.
NameNode specific configuration:
- At present, NameNode specific configuration, these will all be configured only on the NameNode. First, add the DataNode hostnames to
/etc/hosts. Y'all can get the hostname for each DataNode by entering$ hostname, or$ echo $(hostname)on each DataNode. - Now edit
/etc/hostsand include these lines:
          <namenode_IP> namenode_hostname
<datanode1_IP> datanode1_hostname
<datanode2_IP> datanode2_hostname
<datanode3_IP> datanode3_hostname
127.0.0.1 localhost - Edit
hdfs-site.xmlfile on NameNode every bit beneath:
          <configuration>
            <property>
            <proper name>dfs.replication</name>
            <value>3</value>
            </property>
            <property>
            <name>dfs.namenode.name.dir</name>
            <value>file:///usr/local/hadoop/information/hdfs/namenode</value>
            </property>
</configuration> -
dfs.replicationsets how many times each data block is replicated beyond the cluster.dfs.namenode.name.dirsets the directory for storing NameNode data (.fsimage). Yous'll also take to create the directory to store the data.
$ sudo mkdir -p $HADOOP_HOME/information/hdfs/namenode - Side by side, you lot'll create the
mastersfile inHADOOP_CONF_DIR. Themastersfile sets which machine the secondary namenode runs on. In your example, you'll have the secondary NameNode run on the same machine as the NameNode, so editmasters, add the hostname of NameNode (Annotation: Non the public hostname, but the hostname you go from$ hostname). Typically though, you would have the secondary NameNode run on a unlike machine than the main NameNode. - Next, edit the
slavesfile inHADOOP_CONF_DIR, this file sets the machines that are DataNodes. Inslaves, add the hostnames of each datanode (Annotation: Again, not the public hostname, only$ hostnamehostnames). Theslavesfile might already contain a linelocalhost, you should remove it, otherwise the NameNode would run every bit a DataNode too. It should look like this:
          datanode1_hostname
datanode2_hostname
datanode3_hostname - Finally on the NameNode, change the owner of
HADOOP_HOMEtoubuntu
$ sudo chown -R ubuntu $HADOOP_HOME DataNode specific configura:
- Edit
HADOOP_CONF_DIR/hdfs-site.xmlon each DataNode:
          <configuration>
            <holding>
            <name>dfs.replication</proper noun>
            <value>3</value>
            </belongings>
            <property>
            <name>dfs.datanode.data.dir</name>
            <value>file:///usr/local/hadoop/data/hdfs/datanode</value>
            </holding>
</configuration> - Again, this sets the directory where the data is stored on the DataNodes. And again, create the directory on each DataNode. Also modify the owner of the Hadoop directory.
          $ sudo mkdir -p $HADOOP_HOME/data/hdfs/datanode
$ sudo chown -R ubuntu $HADOOP_HOME
Launch Hadoop Cluster
- On the NameNode, format the file system, and so start HDFS.
          $ hdfs namenode -format
$ $HADOOP_HOME/sbin/offset-dfs.sh - Start YARN.
$ $HADOOP_HOME/sbin/offset-yarn.sh - Starting time the job history server.
$ $HADOOP_HOME/sbin/mr-jobhistory-daemon.sh start historyserver - To run across the Java processes (Hadoop daemons for instance), enter
$jps You can access the NameNode WebUI.

References
[1] Intro to Hadoop and MapReduce, Udacity

Source: https://ai.plainenglish.io/setup-4-node-hadoop-cluster-on-aws-ec2-instances-afb0e9a67334
Posted by: pagannelf1973.blogspot.com
0 Response to "How To Install Hadoop On Aws Ec2 Instance"
Post a Comment